Showing posts with label debian. Show all posts
Showing posts with label debian. Show all posts
February 22, 2021
oracle free tier compute instance vps install debian 10 buster image
The article has been moved here: https://faxmodem.eu/blog/development/cloud-serverless/oracle-free-tier-compute-instance-vps-install-debian-10-buster-image/
October 14, 2019
fail2ban bans wrong port with iptables
If you created a custom non-SSH action for fail2ban, and while it does get triggered, the offender can still get through, make sure you've used the right iptables ban action. iptables-multiport will work with the ports you specify next to it in your config; if you don't specify any, it reverts to 22 (default SSH). My custom action.d was for Nginx (ports 80 and 443), and the ban essentially didn't work. The key is to use iptables-allports - it will ban the offender completely, regardless of ports, and using it seems to make the most sense anyway.
You can check which port was banned by running iptables -L and looking for the chain name matching your jail name.
Source: https://serverfault.com/a/382891
December 14, 2018
raspberry pi openbox screen resolution
Sometimes a monitor won't report it's largest available screen resolution correctly. In such a case, you'll have to set it manually. My first hit on Google suggested some
xrandr trickery which didn't work for me. Here's what did.
sudo raspi-configGo to Advanced Options -> Resolution and choose yours. Both DMT and CEA modes worked on multiple devices, just make sure you got the right screen ratio and refresh rate.
August 29, 2018
ssh tunnel systemctl systemd service
sudo vi /lib/systemd/system/mytunnel@.service:
[Unit]
Description=My Tunnel Service
After=network.target
StartLimitIntervalSec=0
[Service]
Type=simple
Restart=always
RestartSec=1
User=username
ExecStart=/usr/bin/autossh -f -N %i

[Install]
WantedBy=multi-user.target
/home/username/.ssh/config:
Host myhost
Hostname my-ssh-host.example.com
User username
RemoteForward 0.0.0.0:22022 localhost:22
IdentityFile /home/username/.ssh/id_rsa
ServerAliveInterval 30
ServerAliveCountMax 32
# warning: MITM
UserKnownHostsFile=/dev/null
StrictHostKeyChecking no
Replace username with actual user name. Usage:
sudo systemctl start mytunnel@myhost
sources:
August 16, 2018
VBoxLinuxAdditions.run permission denied debian
Trying to install VirtualBox Guest Additions on a Debian machine, getting Permission Denied on that last step.
Add
sh:
sh /media/cdrom/VBoxLinuxAdditions.runsource
August 14, 2018
Leafpad: lightweight GUI text editor for rox-filer on Openbox / Raspberry PI
I needed a lightweight file manager for an Openbox machine. rox-filer seemed like a decent option. But in order to look for and manage some config files, I needed the ability to quickly view their contents, so rox-filer alone wasn't enough, I needed a lightweight file editor too. Looking through the officially suggested options, I found leafpad. I ran most of those suggestions against apt-get install --no-install-recommends, and even with the no-recommends flag there were about 50MB of required dependencies. However, leafpad (as well as rox-filer itself) required no additional packages to be installed.
apt-get install --no-install-recommends -y rox-filer leafpad
Then go to $HOME/.config/rox.sourceforge.net/MIME-types/text and put the following inside:
#!/bin/sh
LEAFPAD="$(which leafpad)"
"${LEAFPAD}" "$@"
Then you can right click pretty much any file, then choose "File 'example'" and then "Open As Text".
February 22, 2018
raspberry raspbian debian dhcp dhcpcd wicd wifi not connected
Pretty much the same issue as desceibed here:
The network shows up in the wicd-client menu, and when I click connect, it gives me the usual messages: Doyle-WiFi: Disconnecting active connections... Doyle-WiFi: Putting interface up... Doyle-WiFi: Validating authentication... Doyle-WiFi: Obtaining IP address... Doyle-WiFi: Done connecting... But it doesn't actually connect to the network, and just goes back to the default "Not connected" message.Source: Wicd looks like it's connecting just fine, but doesn't I'm using this on a raspbian with WICD GUI installed. What helped me was going to Wicd settings, then external programs and setting the preferred DHCP client to
dhclient source
February 18, 2017
L2TP/IPSEC VPN on a Debian VPS
ipsec Segmentation Fault
root# invoke-rc.d ipsec start
Job for ipsec.service failed. See 'systemctl status ipsec.service' and 'journalctl -xn' for details.
invoke-rc.d: initscript ipsec, action "start" failed.
root# systemctl status ipsec.service
ipsec.service - LSB: Start Openswan IPsec at boot time
Loaded: loaded (/etc/init.d/ipsec)
Active: failed (Result: exit-code) since Sat 2017-02-18 15:17:07 CET; 3s ago
Process: 844 ExecStart=/etc/init.d/ipsec start (code=exited, status=139)
Feb 18 15:17:07 vpn-example.com systemd[1]: Starting LSB: Start Openswan IPsec at boot time...
Feb 18 15:17:07 vpn-example.com ipsec[844]: Segmentation fault
Feb 18 15:17:07 vpn-example.com ipsec[844]: failed to start openswan IKE daemon - the following error occured:
Feb 18 15:17:07 vpn-example.com systemd[1]: ipsec.service: control process exited, code=exited status=139
Feb 18 15:17:07 vpn-example.com systemd[1]: Failed to start LSB: Start Openswan IPsec at boot time.
Feb 18 15:17:07 vpn-example.com systemd[1]: Unit ipsec.service entered failed state.
root# /etc/init.d/ipsec start
Segmentation fault
failed to start openswan IKE daemon - the following error occured:
Solution: make sure
/etc/ipsec.conf has an empty line at the end of file.source
Verify the configuration
ipsec verify
Using tcpdump to debug L2TP/IPSEC UDP packets
If you're getting the following error:Error 789: The L2TP connection attempt failed because the security layer encountered a processing error during initial negotiations with the remote computerYou'll need to confirm if the packets are reaching the VPN server:
tcpdump -i any -n -nn icmp or \( udp and \( port 500 or port 1701 or port 4500 \) \)
source
https://www.elastichosts.com/blog/linux-l2tpipsec-vpn-server/
https://gist.github.com/mietek/4877cd74423bf6925b92
https://wiki.openwrt.org/inbox/openswanxl2tpvpn
https://github.com/xelerance/Openswan/wiki/L2tp-ipsec-configuration-using-openswan-and-xl2tpd
http://blog.jameskyle.org/2012/07/configuring-openswan-ipsec-server/
https://raymii.org/s/tutorials/IPSEC_L2TP_vpn_on_a_Raspberry_Pi_with_Arch_Linux.html
https://habrahabr.ru/company/FastVPS/blog/205162/
February 16, 2017
Как быстро узнать какие HTTP-запросы делает iPhone/iPad с помощью своего прокси-сервера
Мне нужно было быстро посмотреть какие запросы отсылает айфон в интернет, и какие HTTP ответы получает. Для этого нужно использовать HTTP прокси, и если под руками есть VDS-ка, можно задействовать ее.
Разрешим не-SSL запросы, найдите http_access
Если вылетает ошибка доступа (TCP_DENIED/403 Access Denied):
то вам нужно разрешить свой IP-адрес в настройках /etc/squid3/squid.conf:
На смартфоне/планшете, зайдите в Настройки - Wi-Fi - напротив сети, к которой подключены, нажмите i - пролистайте вниз до PROXY/Прокси HTTP - укажите IP-адрес сервера и номер порта; выключите авторизаци./аутентификацию
Это все. Вы можете отследить запросы в файле /var/log/squid3/access.log.
эта же статья на английском
Шаг 1/2: Установка Squid3
apt-get update
apt-get install -y squid3
Разрешим не-SSL запросы, найдите http_access
# Deny requests to certain unsafe portsи раскомментируйте последнюю строку выше.
http_access deny !Safe_ports
Если вылетает ошибка доступа (TCP_DENIED/403 Access Denied):
ОШИБКА: Запрошенный URL не может быть получен
При получении URL произошла следующая ошибка Доступ запрещён.
Система контроля доступа не позволяет выполнить ваш запрос сейчас. Обратитесь к вашему администратору
то вам нужно разрешить свой IP-адрес в настройках /etc/squid3/squid.conf:
acl my_ip src 123.123.123.123Замените 123.123.123.123 на свой ип-адрес и втавьте фрагмент на самый верх файла конфигурации!
http_access allow my_ip
Шаг 2/2: Настройка iOS устройства
Сначала узнаем на каком порту работает squid:netstat -apn | grep squid | grep LISTEN
На смартфоне/планшете, зайдите в Настройки - Wi-Fi - напротив сети, к которой подключены, нажмите i - пролистайте вниз до PROXY/Прокси HTTP - укажите IP-адрес сервера и номер порта; выключите авторизаци./аутентификацию
Это все. Вы можете отследить запросы в файле /var/log/squid3/access.log.
эта же статья на английском
Debugging iPhone/iPad HTTP requests using squid3 proxy
I needed to debug the requests an iOS app was making. An option is to configure your Wi-Fi setings to use an HTTP proxy, and if you have a Debian VPS/server, I think that'd be the fastest way to get this done.
Allow non-ssl requests: find the http_access block
If you're getting the TCP_DENIED/403 error:
You will have to allow your IP address in /etc/squid3/squid.conf:
On your iOS device, go to Settings - Wi-Fi - tap the i in front of the network you're connected to - scroll to PROXY HTTP - add your server IP and port; turn off authentication
That's it. You should now see the requests the iPhone makes in /var/log/squid3/access.log.
Step 1/2: Install Squid3
apt-get update
apt-get install -y squid3
Allow non-ssl requests: find the http_access block
# Deny requests to certain unsafe portsComment out the last line.
http_access deny !Safe_ports
If you're getting the TCP_DENIED/403 error:
ERROR: The requested URL could not be retrieved
The following error was encountered while trying to retrieve the URL: Access Denied.
Access control configuration prevents your request from being allowed at this time. Please contact your service provider if you feel this is incorrect.
You will have to allow your IP address in /etc/squid3/squid.conf:
acl my_ip src 123.123.123.123Replace 123.123.123.123 with your IP address and add the above lines to the very top of the file!
http_access allow my_ip
Step 2/2: Configure iOS to use your proxy
Find out your squid port:netstat -apn | grep squid | grep LISTEN
On your iOS device, go to Settings - Wi-Fi - tap the i in front of the network you're connected to - scroll to PROXY HTTP - add your server IP and port; turn off authentication
That's it. You should now see the requests the iPhone makes in /var/log/squid3/access.log.
December 30, 2016
ffmpeg codec input stream subtitles
When trying to convert an .mkv file with .ass subtitles, ffmpeg gave me the following error:
decoder: codec not found for input stream
turns out, it fails to detect and convert the subtitles coded. there are two options that i know of:
- disable the subtitles for that video file, use the “-sn” option
- simply copy the subtitles codec, use “-scodec copy”
source & more info: https://en.wikibooks.org/wiki/FFMPEG_An_Intermediate_Guide/subtitle_options#Set_Subtitle_Codec
December 10, 2016
Перенос файлов между серверами без скачивания на локальный компьютер
Если нужно перенести файлы с одного VPS/VDS или просто сервера на другой, не обязательно сначала скачивать их себе на компьютер, можно скопировать напрямую.
Прежде всего, определимся, что сервер-источник это ОТКУДА нужно перенести, а сервер назначения - это КУДА нужно перенести.
Для этого зайдите по SSH на сервер назначения и воспользуйтесь командой
Если нужно перенести всю папку, укажите параметр
Чтобы сохранить оригинальные даты, укажите
Если на сервере, к которому подключаемся, нестандартный порт SSH. укажите его с помощью
Пароль от пользователя, под которым авторизуетесь, держите наготове, сразу спросит.
Перенесенные файлы сохранят оригинальное время модификации (date changed/modified).
Прежде всего, определимся, что сервер-источник это ОТКУДА нужно перенести, а сервер назначения - это КУДА нужно перенести.
Для этого зайдите по SSH на сервер назначения и воспользуйтесь командой
scp:scp root@source.com:/home/file /home/file
Если нужно перенести всю папку, укажите параметр
-r (рекурсивно)Чтобы сохранить оригинальные даты, укажите
-p.scp -r -p root@source.com:/home/my_dir /homeвнимание, дописывать имя нужной папки к пути назначения не нужно
Если на сервере, к которому подключаемся, нестандартный порт SSH. укажите его с помощью
-P:scp -P 22 -r -p root@source.com:/home/my_dir /home
Пароль от пользователя, под которым авторизуетесь, держите наготове, сразу спросит.
Перенесенные файлы сохранят оригинальное время модификации (date changed/modified).
Внимание! В scp нет фильтров по существующим на сервере назначения объектам, и по определённым папкам. Перезапишет всё подряд. Перенося сайт, например, пропустить папку ./.git не выйдет.
September 26, 2015
debian rtorrent/rutorrent setup script
save the following as
~/seedbox.sh:
#!/bin/sh
USER="seedbox"
DIR_BASE="/var/www/seedbox"
DIR_PUB="$DIR_BASE/public"
DIR_SESS="$DIR_BASE/session"
DIR_DL="$DIR_PUB/downloads"
DIR_UI_PATH="webui"
DIR_UI="$DIR_PUB/$DIR_UI_PATH"
read -p "htpasswd user: " htpasswd_user
read -p "htpasswd pass: " htpasswd_pass
PORT_SCGI=$(date -u "+%N" | cut -c 6,7,8)
PORT_SCGI="5${PORT_SCGI}"
PORT_HTTP_DEF=$(date -u "+%N" | cut -c 6,7,8)
PORT_HTTP_DEF="8${PORT_HTTP_DEF}"
PORT_SSH_DEF=$(date -u "+%N" | cut -c 7,8)
PORT_SSH_DEF="22${PORT_SSH_DEF}"
read -p "SSH port [${PORT_SSH_DEF}]: " PORT_SSH
if [ "$PORT_SSH" = "" ]; then
PORT_SSH=$PORT_SSH_DEF
fi
read -p "HTTP port [${PORT_HTTP_DEF}]: " PORT_HTTP
if [ "$PORT_HTTP" = "" ]; then
PORT_HTTP=$PORT_HTTP_DEF
fi
# get the country code so we can use the closest debian mirror
wget -O /tmp/countryCode http://ip-api.com/csv?fields=countryCode
COUNTRYCODE=`cat /tmp/countryCode | sed 's/./\L&/g'`
sed -i "s/\.us\./.${COUNTRYCODE}./g" /etc/apt/sources.list
export DEBIAN_FRONTEND=noninteractive
apt-get update
apt-get install -y debian-keyring
apt-get install -y debian-archive-keyring
for k in $(apt-get update 2>&1|grep -o NO_PUBKEY.*|sed 's/NO_PUBKEY //g');do echo "key: $k";gpg --recv-keys $k;gpg --recv-keys $k;gpg --armor --export $k|apt-key add -;done
apt-get update
apt-get remove libxmlrpc-c*
apt-get install -q -y --no-install-recommends -o Dpkg::Options::="--force-confnew" gcc g++ build-essential apache2 libapache2-mod-scgi php5 php5-xmlrpc php5-cli rtorrent screen mediainfo ffmpeg
printf "SCGIMount \"/RPC2\" 127.0.0.1:${PORT_SCGI}">/etc/apache2/mods-available/scgi.conf
ln -s /etc/apache2/mods-available/scgi.conf /etc/apache2/mods-enabled/
ln -s /etc/apache2/mods-available/scgi.load /etc/apache2/mods-enabled/
cat > /etc/init.d/rtorrent <###
#############
# This script depends on screen.
# For the stop function to work, you must set an
# explicit session directory using ABSOLUTE paths (no, ~ is not absolute) in your rtorrent.rc.
# If you typically just start rtorrent with just "rtorrent" on the
# command line, all you need to change is the "user" option.
# Attach to the screen session as your user with
# "screen -dr rtorrent". Change "rtorrent" with srnname option.
# Licensed under the GPLv2 by lostnihilist: lostnihilist _at_ gmail _dot_ com
##############
######
##############
#######################
##Start Configuration##
#######################
# You can specify your configuration in a different file
# (so that it is saved with upgrades, saved in your home directory,
# or whateve reason you want to)
# by commenting out/deleting the configuration lines and placing them
# in a text file (say /home/user/.rtorrent.init.conf) exactly as you would
# have written them here (you can leave the comments if you desire
# and then uncommenting the following line correcting the path/filename
# for the one you used. note the space after the ".".
# . /etc/rtorrent.init.conf
#Do not put a space on either side of the equal signs e.g.
# user = user
# will not work
# system user to run as
user="$USER"
# the system group to run as, not implemented, see d_start for beginning implementation
# group=\`id -ng "\$user"\`
# the full path to the filename where you store your rtorrent configuration
config="\`su -c 'echo \$HOME' \$user\`/.rtorrent.rc"
# set of options to run with
options=""
# default directory for screen, needs to be an absolute path
base="\`su -c 'echo \$HOME' \$user\`"
# name of screen session
srnname="rtorrent"
# file to log to (makes for easier debugging if something goes wrong)
logfile="/var/log/rtorrentInit.log"
#######################
###END CONFIGURATION###
#######################
PATH=/usr/bin:/usr/local/bin:/usr/local/sbin:/sbin:/bin:/usr/sbin
DESC="rtorrent"
NAME=rtorrent
DAEMON=\$NAME
SCRIPTNAME=/etc/init.d/\$NAME
checkcnfg() {
exists=0
for i in \`echo "\$PATH" | tr ':' '\n'\` ; do
if [ -f \$i/\$NAME ] ; then
exists=1
break
fi
done
if [ \$exists -eq 0 ] ; then
echo "cannot find rtorrent binary in PATH \$PATH" | tee -a "\$logfile" >&2
exit 3
fi
if ! [ -r "\${config}" ] ; then
echo "cannot find readable config \${config}. check that it is there and permissions are appropriate" | tee -a "\$logfile" >&2
exit 3
fi
session=\`getsession "\$config"\`
if ! [ -d "\${session}" ] ; then
echo "cannot find readable session directory \${session} from config \${config}. check permissions" | tee -a "\$logfile" >&2
exit 3
fi
}
d_start() {
#chmod 777 /var/run/screen #Fix Ubuntu 10.04 screen bug
[ -d "\${base}" ] && cd "\${base}"
stty stop undef && stty start undef
su -c "screen -ls | grep -sq "\.\${srnname}[[:space:]]" " \${user} || su -c "screen -dm -S \${srnname} 2>&1 1>/dev/null" \${user} | tee -a "\$logfile" >&2
# this works for the screen command, but starting rtorrent below adopts screen session gid
# even if it is not the screen session we started (e.g. running under an undesirable gid
#su -c "screen -ls | grep -sq "\.\${srnname}[[:space:]]" " \${user} || su -c "sg \"\$group\" -c \"screen -fn -dm -S \${srnname} 2>&1 1>/dev/null\"" \${user} | tee -a "\$logfile" >&2
su -c "screen -S "\${srnname}" -X screen rtorrent \${options} 2>&1 1>/dev/null" \${user} | tee -a "\$logfile" >&2
}
d_stop() {
session=\`getsession "\$config"\`
if ! [ -s \${session}/rtorrent.lock ] ; then
return
fi
pid=\`cat \${session}/rtorrent.lock | awk -F: '{print(\$2)}' | sed "s/[^0-9]//g"\`
if ps -A | grep -sq \${pid}.*rtorrent ; then # make sure the pid doesn't belong to another process
kill -s INT \${pid}
fi
}
getsession() {
session=\`cat "\$1" | grep "^[[:space:]]*session[[:space:]]*=" | sed "s/^[[:space:]]*session[[:space:]]*=[[:space:]]*//" \`
echo \$session
}
checkcnfg
case "\$1" in
start)
echo -n "Starting \$DESC: \$NAME"
d_start
echo "."
;;
stop)
echo -n "Stopping \$DESC: \$NAME"
d_stop
echo "."
;;
restart|force-reload)
echo -n "Restarting \$DESC: \$NAME"
d_stop
sleep 1
d_start
echo "."
;;
*)
echo "Usage: \$SCRIPTNAME {start|stop|restart|force-reload}" >&2
exit 1
;;
esac
exit 0
END
chmod +x /etc/init.d/rtorrent
update-rc.d rtorrent defaults
useradd $USER -U -d $DIR_BASE
mkdir -p $DIR_SESS $DIR_DL $DIR_UI
cat > "$DIR_BASE/.rtorrent.rc" <'>$DIR_PUB/index.php
chown -R $USER:$USER $DIR_BASE
find $DIR_UI/share -type d -exec chmod 0777 {} ';'
printf "Alias /$DIR_UI_PATH $DIR_UI\n\nAuthType Basic\nAuthName \"Authorization Required\"\nAuthUserFile $DIR_BASE/.htpasswd\nRequire valid-user\n " > /etc/apache2/conf.d/$DIR_UI_PATH
htpasswd -c -b "${DIR_BASE}/.htpasswd" $htpasswd_user $htpasswd_pass
rm "${DIR_UI}/.htaccess"
sed -i "s/scgi_port = 5000/scgi_port = $PORT_SCGI/g" $DIR_UI/conf/config.php
sed -i "s/Port 22/Port $PORT_SSH/g" /etc/ssh/sshd_config
sed -i "s/80/$PORT_HTTP/g" /etc/apache2/ports.conf
sed -i "s/80/$PORT_HTTP/g" /etc/apache2/sites-available/default
invoke-rc.d apache2 restart
invoke-rc.d rtorrent restart
apt-get clean
apt-get autoremove
echo "**** The new SSH port is: ${PORT_SSH}"
echo "**** The new HTTP port is: ${PORT_HTTP}"
invoke-rc.d ssh restart
reboot
and then run:
sh ~/seedbox.sh
Access your new seedbox at http://IP:PORT_HTTP/webui
MAke sure you also use a new SSH, password.
September 30, 2014
Как устранить уязвимость Shellshock на сервере или VDS под управлением Debian
Проверьте присутствует ли уязвимость:
env X="() { :;} ; echo busted" bash -c "echo stuff"
Если в выводе содержится "busted", дыра Shellshock присутствует.
Как это выглядит на уязвимой машине под управлением Debian OpenVZ VPS:

Вверху видно что текущая версия Bash это 4.2.
Теперь латаем дыру.
Обновляем список пакетов.
apt-get update
Проверьте свою версию баша. В моем случае это была 4.2+dfsg-0.1+deb7u3. Обновите баш. Здесь описано как выбрать определенную версию пакета для установки в случае если доступны несколько.
apt-get install bash=4.2+dfsg-0.1+deb7u3
Воткак выглядит пропатченный сервер:

Старая версия была 4.2+dfsg-0.1, после обновления стала 4.2+dfsg-0.1+deb7u3. Ну и последний тест, в результате которого значение busted
не выводится.
Источник: http://habrahabr.ru/company/mailru/blog/238475/
How to quickly check and fix the Shellshock Bash vulnerability
First, see if this applies to you. Though since all of the bash versions for the last 25 years are vulnerable to this exploit, it most likely does.
To check if your machine has the Shellshock vulnerability, run the following:
env X='() { :;}; echo vulnerable' bash -c "echo this is a test"
If the output includes "busted", the machine is vulnerable to the Shellshock exploit.
Here's an example of how the output looks like on an infected Debian OpenVZ VPS:
At the top of the output you can see the current Bash version being 4.2.
Now, this is the time to update your bash version to the one that is more secure and has the exploit patched.
First, update the package list.
apt-get update
Refer to this in case you get the GPG errors.
Then see what's the latest Bash version you got. In my case it was 4.2+dfsg-0.1+deb7u3. Upgrade Bash to the latest version. Here's how you can specify which version of the package to install in case you have multiple available.
apt-get install bash=4.2+dfsg-0.1+deb7u3
This will install the recent version.
Here's how the patched VPS looks like now:
As you can see, initially the bash version was 4.2+dfsg-0.1, and after the upgrade it's 4.2+dfsg-0.1+deb7u3. Then there's another test which doesn't output the busted
value anymore.
Source: http://habrahabr.ru/company/mailru/blog/238475/
UPD: More vulnerabilities to test against: http://en.wikipedia.org/wiki/Shellshock_(software_bug)#Reported_vulnerabilities. Bad news is that not all of those are fixed by the update, so now we wait.How To Install A Specific Package Version On A Debian Machine
apt-cache policy bash
then see what versions are available
then type apt-get install package=version
see the image for an example
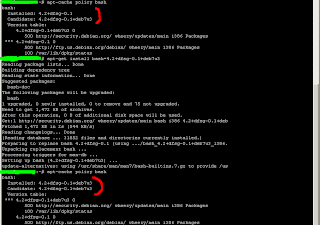 source: http://blog.andrewbeacock.com/2007/03/how-to-install-specific-version-of.html

October 22, 2012
Свой DNS-сервер для параноиков
This is how you make a DNS server from your low-end Debian VPS.
Теперь можно указать в
Наполнять любыми доменами по своему желанию.
В статье используется DNS-сервер 208.67.222.222. Список других бесплатныйх ДНСов: (взят отсюда)
apt-get update
apt-get install -y --no-install-recommends resolvconf dnsmasq

sed -i 's,#\(no-resolv\),\1,' /etc/dnsmasq.conf
sed -i 's,#\(no-poll\),\1,' /etc/dnsmasq.conf
sed -i 's,#\(log-queries\),\1,' /etc/dnsmasq.conf
echo "server=208.67.222.222" >> /etc/dnsmasq.conf
echo "log-facility=/var/log/dnsmasq.log" >> /etc/dnsmasq.conf
/etc/init.d/dnsmasq restart

echo "nameserver 127.0.0.1" > /etc/resolv.conf
Теперь можно указать в
/etc/hosts список вечно блокируемых на уровне ДНС сайтов:
127.0.0.1 google-analytics.com
127.0.0.1 www.google-analytics.com
127.0.0.1 ssl.google-analytics.com
127.0.0.1 counter.yadro.ru
127.0.0.1 top.list.ru
127.0.0.1 counter.rambler.ru
127.0.0.1 top100-images.rambler.ru
127.0.0.1 mc.yandex.ru
и т.д.
Наполнять любыми доменами по своему желанию.
В статье используется DNS-сервер 208.67.222.222. Список других бесплатныйх ДНСов: (взят отсюда)
Другие DNS-сервисы:

OpenDNS.com:
208.67.222.222
208.67.220.220

http://www.scrubit.com/
67.138.54.100
207.225.209.66

http://www.dnsadvantage.com/
156.154.70.1
156.154.71.1

Level 3 Communications
4.2.2.1
4.2.2.2
4.2.2.3
4.2.2.4
4.2.2.5
4.2.2.6

Verizon
151.197.0.38
151.197.0.39
151.202.0.84
151.202.0.85
151.202.0.85
151.203.0.84
151.203.0.85
199.45.32.37
199.45.32.38
199.45.32.40
199.45.32.43

GTE
192.76.85.133
206.124.64.1

One Connect IP
67.138.54.100

Exetel
220.233.167.31

VRx Network Services
99.166.31.3

SpeakEasy
66.93.87.2
216.231.41.2
216.254.95.2
64.81.45.2
64.81.111.2
64.81.127.2
64.81.79.2
64.81.159.2
66.92.64.2
66.92.224.2
66.92.159.2
64.81.79.2
64.81.159.2
64.81.127.2
64.81.45.2
216.27.175.2
66.92.159.2
66.93.87.2

Sprintlink
199.2.252.10
204.97.212.10
204.117.214.10

Cisco
64.102.255.44
128.107.241.185

При использовании этих серверов вместо серверов провайдера будьте готовы, что запросы станут выполняться медленнее, т.к. серверы расположены далеко от вас.
March 11, 2012
Почему я перешёл с FreeBSD на Debian
Так уж сложилось, что из всего зоопарка многообразия Linux-дистрибутивов я чаще всего пользовался Debian'ом. Особая заслуга здесь дешевых забугорных VPS-провайдеров: многие из них используют виртуализацию на базе технологий OpenVZ или Xen, в результате чего FreeBSD не предлагалась, и в 100% случаев самым вменяемым (для меня) шаблоном оказывался тот самый Debian. А любимая ранее Фрибзда позабылась, оставшись на паре FirstVDS'ных серверов.
March 3, 2012
Installing Java and Tomcat on a Debian box; binding Tomcat to IPv4 address
Update the package list:
apt-get updateInstall Java:
- Version 5:
apt-get install sun-java5-jdk
- Or version 6:
apt-get install sun-java6-jdk
$JAVA_HOME variable as well as set IPv4 stack as preferable in /etc/profile and reload the file so those variables are available instantly without rebooting the server:
- Java 5:
echo -e "\nJAVA_HOME=\"/usr/lib/jvm/java-1.5.0-sun\"\nexport JAVA_HOME\nJAVA_OPTS=\"-Djava.net.preferIPv4Stack=true\"\nexport JAVA_OPTS">>/etc/profile && source /etc/profile
- Java 6:
echo -e "\nJAVA_HOME=\"/usr/lib/jvm/java-6-sun/\"\nexport JAVA_HOME\nJAVA_OPTS=\"-Djava.net.preferIPv4Stack=true\"\nexport JAVA_OPTS">>/etc/profile && source /etc/profile
- Version 5.5:
apt-get install tomcat5.5 tomcat5.5-admin tomcat5.5-webapps
- Version 6:
apt-get install tomcat6 tomcat6-admin tomcat6-examples
- Version 7 (from source):
wget http://mirrors.besplatnyeprogrammy.ru/apache/tomcat/tomcat-7/v7.0.26/bin/apache-tomcat-7.0.26.tar.gz && tar -xzvf apache-tomcat-7.0.26.tar.gz && mv apache-tomcat-7.0.26 /usr/share/tomcat
Init script:vi /etc/init.d/tomcat
#!/bin/sh
case $1 in
    start)
        sh /usr/share/tomcat/bin/startup.sh
        ;;
    stop)
        sh /usr/share/tomcat/bin/shutdown.sh
        ;;
    restart)
        sh /usr/share/tomcat/bin/shutdown.sh
        sh /usr/share/tomcat/bin/startup.sh
        ;;
    esac
exit 0
Make it executable:chmod +x /etc/init.d/tomcat
/etc/tomcat5.5/server.xml or /usr/share/tomcat5.5/conf/server.xml for Tomcat 5.5) and add the following attribute to the Connector tag:
address="0.0.0.0"This will force Tomcat to bind to IPv4 address instead of IPv6 only. Start Tomcat (for version 5.5):
/etc/init.d/tomcat5.5 restartCheck if Tomcat is running:
netstat -aP.S. user settings (in
/etc/tomcat5.5/tomcat-users.xml):
<role rolename="manager"/>
<role rolename="admin"/>
<user username="USERNAME" password="PASSWORD" roles="admin,manager"/>
P.P.S. memory tuning:
export CATALINA_OPTS="-Xms64m -Xmx64m" && export JAVA_OPTS="-Xms64m -Xmx64m"NOTE If Tomcat restarts but doesn't show up in
netstat -an, this may be the issue: ibot.rikers.org/#tomcat/20120401.html.gz.
Tomcat 6 was installed using the default Debian package manager. However, it was not configured properly: it searches for server.xml in /usr/share/tomcat6/conf on startup while the config is not there. Try the following to make sure this is the issue:
/usr/share/tomcat6/bin/catalina.sh run
If the command returns Cannot start server. Server instance is not configured you will have to fix the config path:
ln -s /etc/tomcat6 /usr/share/tomcat6/conf
Sources:
January 22, 2012
bash shell urllist crawler
#!/bin/bash
# linux urllist.txt sitemap generator
# run the spider again for deeper URLs
# written by Joachim De Zutter
# released under GPL
site="www.example.com"
startpage="http://www.example.com/"
lynx -dump $startpage | grep -i "$site" | sed -e "s/.*\(http:\/\/.*$site\/[^\"\'<>#\&]*\).*/\1/g" >>urllist.txt
while read a
do
  echo $a
  sort -u urllist.txt | grep -v "\.\.\." >urllist.tmp
  mv urllist.tmp urllist.txt
  lynx -dump $a | grep -i "$site" | sed -e "s/.*\(http:\/\/.*$site\/[^\"\'<>#\&]*\).*/\1/g" >>urllist.txt
done <urllist.txt
Subscribe to:
Posts (Atom)
